Last weekend was a perfect practice for the next two. I finished three dresses (none of them for me!), had great fun swing dancing, and went on a mini road trip!
Hamilton Gardens was the road trip destination; for the Katherine Mansfield Garden Party, after seeing the gardens I can’t believe I had never been there before. Even if they hadn’t been hosting a 1920s garden party with vintage cars, live music, swing dancing and Hendricks Gin (thanks to my friends at Glory Days Magazine) the gardens would have been worth the drive down. I have the sunburn to prove it was a brilliant day. I took no photos, which proves I was far too busy having fun in front of other peoples cameras to stop and take any with mine (also I think it has to do with the fact none of my dresses have pockets! I do only have myself to blame…).
Well, more on the garden party later, now back to sewing… I finished three commissions!
One dress commissioned by a friend for a wedding, and two dresses for the Emma-bear for Art Deco Napier.
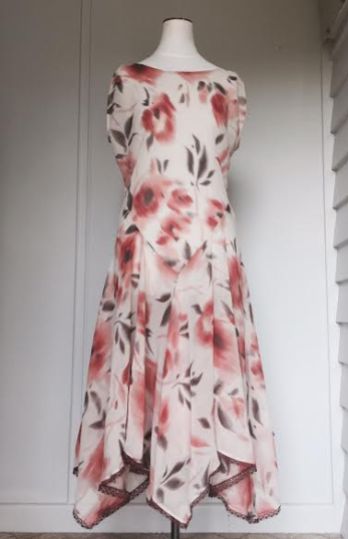
Emma is the best type of customer… my best friend! She chose her fabric from my stash over Skype (sob, we live in different countries) and then left me to my own devices to design a dress! After my recent success with the 1931 dress pattern from Patterns for Fashion 2, I wanted to test out another original pattern from the book. The one which caught my attention was this one from 1929, another dress featuring a bias cut, this time attributed to the queen of the bias cut herself – Madeleine Vionnet.

One of the things which I have noticed with both patterns is that while the panels are cut on the true bias, they are cunningly designed so that the majority of seams actually run on the straight grain. This creates a garment which is able to hug the body using the bias stretch, but isn’t a nightmare to sew as most seams are well behaved.
(On a side note perhaps I should explain… Bias cut simply means the pattern is cut at 45 degrees to the grain of the fabric. Fabric cut this way has a natural ‘stretch’ meaning it drapes and hugs the body without need for seamed shaping such as darts. The trouble is, because the fabric moves so much when cut on the bias it can be a terror to sew. If it is stretched as it is sewn (which is hard to avoid) then the seams ‘bubble’ and do not sit flat, ruining the line of a dress. So that is why these patterns are so clever, they make use of bias’s advantages, but avoid the challenging bias seams.)
I drew out the pattern, adjusting the bodice size down and reducing the skirt length to fit Emmas petite frame. I had 4m of silk and had expected to have plenty for one 1920s dress. But laying my pattern pieces on the fabric quickly showed that 4m was no where near enough!

The pattern has separate pieces for front and back, but the differences appeared very small so I just planned to cut the front twice. I removed the oversize shoulder bows and managed to squeeze the remaining pieces into the fabric available. No worries aye?
The panels flew together, I finished the seams with overlocking, and tested the fit on the mannequin. Initial fit seemed good, so I finished the arm and neckline with bias. The hem however was still too long; on me the lower points of the handkerchief hem just skimmed the tops of my feet, definitely too long for Emma to comfortably dance in. The shorter sections of the handkerchief hem were spot on though, sitting just under the knee. I went around it with a hem gauge marking the long points shorter. Here’s how the adjustments are reflected on the pattern.

The hem was finished with lace, again the pattern requested tricot edging, but lace gives a very similar effect.
And Voila, Emmas dress was done!
She wasn’t expecting another… But it was only 4pm, and I was so thrilled with how the dress had flown together that I wanted to make more!
I have had this blouse mocked up for years.

I draped the pattern so long ago that I cant even remember what fashion plate I used as reference. Anyway, the fit on this blouse is very beautiful, and as the bodice is cut on the bias it was the work of a moment to alter it to fit the skirt of the Vionnet dress. I had another silk chiffon which I hadn’t shown Emma but was fairly confident she would like, however I only had 2m – so had to alter the skirts fullness to fit.
With the alterations to pattern made, this dress also seemed to fly together, hem and sleeves were trimmed in lace, neckline finished with a beautiful piece of viscose grograin ribbon and Voilà again! Another dress complete!
So fingers crossed they fit the wee beastie and I get some gorgeous photos of her to share next week!
Until next time x


